(Text and pictures were copied here from Volkszone technical forum with JBlackmore's permission).
one[]
Description

Description

Description

Description


Description


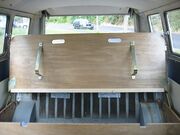
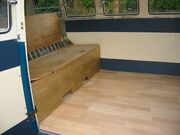
The finished product

The base lifted


Half down


Fully down

A view from outside


A view from the rear

A cloe-up view showing the hinges
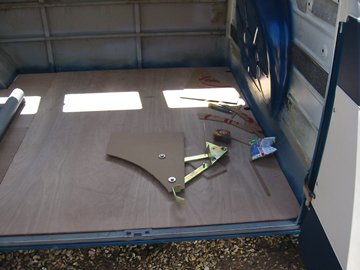
Some notes on this and some pics (taken by me, but if anyone wants to copy them then go ahead), in case this is useful to anyone planning to do this.
Basically the www.justkampers.co.uk R&R bed hinges (Just Kampers part number J11561) are superb, and I think fantastic value for money (£60).
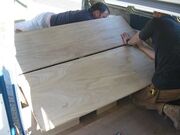
We knocked out the bed from two 8ftx4ft sheets of 18mm ply in about 3 hours, and we are pretty hopeless, so if we can manage this anyone can. There is still a bit of finishing but I would think if we had got on with this two people could have completed it easily in a day.
The main fiddly bit was the bed endplates for a splitscreen bus which are a different size to the bay diagram JK sent me (but I knew they would be) - I made a cardboard template from the JK dimensions and then tried/trimmed it against our bus to fit. See dimensions at end for guidance. The front panel was a bit taller also (end panels should be done first, so you can adjust dimensions for the front panel to match).
Seat back and base are depths as per JK diagram, but width was measured once the other bits were done, as I wanted a full width bed but didn't want the hinges to foul on the interior panels, so made sure there was a generous 30mm clearance each side.
Also in bench mode, the seat is flexing if you sit in the middle, so I need to add a support at the rear, not sure if I will bolt a length of angle iron between the back of the hinges to support the seat, or if I will cut an 18mm ply rear bulkhead to support it on the top of the wheel arches - in the end I just screwed a bit of 22mmx22mm batton along the back edge of the seat base, and this has made a big difference. I've heard from other people that they have used 22mm ply for the seat panel, which avoids this problem - so thats an option.
Anyway, pics of the floor/bed going in are shown, we did a bit more on Saturday cut some hand holes in the seat to pull it out with, and varnished everything with satin varnish both to look nicer and for some water resistance - I am thinking of covering the front panel and seat/back edges with vinyl to match the interior panels (I bought 2 yards on a roll from TMI with the interior stuff for this) as the cut plywood edges are not perfectly clean.
two[]
Finished this off last night and bed/bench works great, so some more info:
I measured my side panel template again last night and the height is the same as the JK diagram, so the front and top edge and hole positions are all as the diagram, the back edge is to clear the bend in the hinges, as for wheel arches it is easiest to cut the ply exactly as the diagram but on the wheel arch part leave it at least one inch bigger than diagram, then bolt the hinge to the end panel, hold it up to the side of the wheel arch and draw round it with a pencil - I still had to trim it slightly as the wheel arch profile varies along its length on our bus (both sides), but it was close and easy to trim the last bit out.
The way the JK diagram (and I built our bed) is that the side panels are slightly lower than the front panel - I assume this is so the hinges are not strained if they do not quite line up, but I think it would be better if the side panels were the right height to support the base of the seat in bench mode, so I suggest you add 30mm to the height of the end panels (above the holes), and then mark and cut that after you have fitted the hinges and end panels and front panel into your bus, so you can use a straightedge on the hinge in bench mode to mark the exact line. A bit of a faff to then take it all out again to cut but this way I think the bench would be perfect.
If you do get the JK hinges then add 5mm to all the bolt lengths they give you, as otherwise they are not long enough for the nyloc part of the nuts to bite - ie the flat head M6 bolts should be 30mm (diagram says 25mm), and the M8 bolts for the hinges should be 40mm (diagram says 30mm) I would also suggest using M6 penny washers on the inside of the hinge bolts and also on the underside of the brace support bolts.
Also, I didn't cut the top notches in the front panel until the very last thing so I could line the bed up flat and make sure the measurements worked OK, they ended up exactly as the JK diagram though !!
For our full width bed we also screwed a piece of 34mm square batton along the back edge of the bench seat otherwise it sagged in the middle if you sat in the middle - this should also help stop the hinges being pulled together which will wear both the hinges and the mounting holes.
The final width for our bed is 1440mm, but we have TMI interior panels and deliberately left a lot of clearance either side so the hinges don't mark the panels when the bed is going up and down (into a bench not hanky panky). The hinges are outside the bed and have a small peg sticking out to lock in bench mode which I think would mark or tear the vinyl panels if it was close enough to touch them - obvoiusly if you had a wood or carpetted side then you could go a lot closer without worrying.
I don't see why you couldn't get a wider bed in - ignoring the hinges the cargo area is around 1560mm wide for us.
I would assume your bed would be somewhere under 1500mm and wait until you have fitted the side panels, and front, and hinges all where you want them to fit your bus, then measure the final width between the hinges last and make the seat and base then.
three[]
The bed is really easy, I am completely hopeless, and even had to borrow a jigsaw as I only have a drill and we managed it easily enough with a couple of mates helping on Saturday.
an 8ftx4ft sheet of 18mm plywood cost me £20 and I needed two for the bed anyway, as I couldn't get the seat back, seat base and front panel out of one sheet, so there was loads of spare wood if we had mucked stuff up - the only difficult bit was the bed side panels which I made out of cardboard first to check the size, and then just drew round on the ply to cut out once sorted.
Also, if you're worried about tatty looking edges, I am planning on covering the front panel and the edges of the seat back and base with vinyl, just glue it on and staple round the edges, this will cover up any rough cuts and I hope will look clean and match the rest of the interior.
I had a look at a few interiors people had paid around £4k upwards and frankly I just could not spend that amount of money on something I could have a go at myself. I don't really want a whole side of the bus filled with cupboard units, as half the time we will use the bus as everyday transport so would rather have more seats and space. When we camp we will have an awning anyway for cooking and storage, so it shouldn't be much of an issue.
I don't mind paying people to do welding or bodywork as there is no way i could do it, even if I spent a fortune on tools and premises, but woodwork is pretty easy so I'm sure anyone could do it with a couple of mates to help out.
So far our total spend on our interior is well under £200 that includes the hinges, timber, fixings, carpet and lino. I just ordered all the foam and it was under £100. And reckon another £100 on material for seat covers and curtains. I reckon the split charging system and extra battery will be well under £100, so reckon we will end up having spent well under £500 total for everything.
I don't think you could get a company to do the floor and a bed for that kind of money these days !!
four[]
Most of the 'new' interiors I have seen look too 'modern' I think, as they are all in fancy finishes and plastic trim on every curved edge. I'm sure this is what people want on a moden motorhome interior, but Its not what I would choose for a classic vehicle.
What I think a lot of people want is a 'devon style' finish, ie stained/varnished plywood and nice basic angular interiors, not fancy curved stuff.
I know Mark (www.gingersbuses.co.uk) has been trying to get an interior like this made for a long time, and has found 3 sperate people who said they could do it, but then let him down - dunno if all chippys are lazy, or if they just can't be bothered with 'small' jobs but I reckon there would be a huge market for someone producing simple modular bits for interiors in finished ply, for easy DIY fitting.
Hadn't spent too much time thinking about the bulkhead end just yet, but plan is to make a simple box seat for storage and occasional sitting but the creative frame idea sounds interesting, will have to look out for this, I assume its a metal frame which you just panel with mdf or ply.
As for not being able to cut a straight line, B&Q will cut plywood for you at 50p a cut, I reckon you could get all the panels edge cut square in 5 cuts on each sheet, so for a fiver you would have all the straight cuts accurate and cleanly cut - frankly I wish I'd done this as it would have saved us about 2 hours.
five[]
Managed to get a lot done this evening, screwed floor down (screws up from underneath), fixed bed frame down to batton on floor, fitted lino in cargo area (laminate wood effect stuff), and Blue carpet over the engine cover. Here are some pics showing the bed up/down and halfway to show the JK hinges working - hope these are helpful to anyone doing this.
six[]
I didn't like the idea of drilling from above as I was worried about hitting something (ie edge of a supporting bar or box section), or drilling into box section which might then leak and rust (as everything underneath has already been waxoyled). Also with the plywood floor in place, it would be a pain to make sure you drilled the holes in the tops of the ridges without loads of accurate measuring and marking.
Drilling from underneath meant it was easy to choose the point in the top of a ridge, also avoid anything awkward, like the heater tube or chassis rails.
I used SIX 3/4" No10 button head screws for the main floor section, roughly 6" in from the corners and two in the middle to stop the floor lifting. The screws stuck up about 1mm through the floor so I grinded the points off with a dremel cutting disk.
For the two small floor sections round the heater tube outlet I used 2" No10 button head screws into lengths of batton which will clamp the floor down, and also the front bed panel is screwed to them to hold the bed down.
I used an aerosol can of underseal with waxoyl underneath on all the exposed screws and holes to weather proof this, so hopefully this should be good for years and years !
seven[]


Template
I didn't use bolts into the engine bay, I used the 'acme screws' as JK recommend, which are thick self tapping bolts - sometimes called roofing bolts, so there is no need to put a nut on behind.
The weight of the bed is mostly supported by the floor, and the end panels are bolted down through to batons bolted to floor, so hopefully the back of the hinges are not under too much load - seems fine and we have used the bed a fair bit over several seasons.
Someone on SSVC asked for dimensions for the side panels, so here is a pic of the cardboard endplate template I made with measurements written on it (just happened to be in the cupboard under the stairs).
People have asked for dimensions of the other panels - these are for a 3/4 width bed, so you can and should adjust the width to whatever you require, but rough measurements are:
Front panel W1095mm x H384mm with slight taper on side to match profile of side of cargo area. Seat Base W1048mm x L539mm Seat Back W1038mm x L438mm
I adjusted the widths of our bed to make it full width, so our bed is 1440 wide, which leaves plenty of clearance each side to avoid damaging our interior panels - you could probably go as wide as 1500mm depending on your interior layout.
I don't recommend you copy these dimensions exactly without checking them against your vehicle, as I expect every bus is slightly different, I started with the dimensions from the JK diagrams (if you ask nicely they will send you 3 pages of diagrams with measurements of all panels) and cut the side of the hinge box a bit bigger, then bolted the hinge to the cardboard, and trimmed and tried it to fit using a straightedge on the hinges in bed mode to line up with the top of the engine cover.